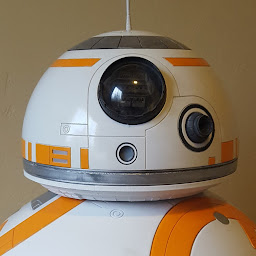
I am working on a project where I want to take a picture of a colored grid as an input (made with Lego bricks in this example) and return a much smaller modified picture.
Here is an example input:

Below is a very small 8x8 image that would be the outcome:

Here is a much larger version of the expected outcome::

Here is my code so far: It only works with black and white images.
from PIL import Image
import re

black = [(110,110,110),(0,0,0)] #The highest value and the lowest RGB value for the color black

img = Image.open("input.jpg") #The input image
size = (8,8) #The dimensions of the output image

out = img.resize(size,resample=Image.LANCZOS) #Resize the image

for y in range(size[0]): #loop through every pixel
    for x in range(size[1]):

        if out.getpixel((x,y)) <= black[0] and out.getpixel((x,y)) >= black[1]: #check to see if the pixel is within the accepted black values

            out.putpixel((x,y), (0,0,0)) #Give the current pixel true color
        else:
            #otherwise make the pixel black
            out.putpixel((x,y), (255,255,255)) #Give the current pixel true color

"""Save the pixelated image"""
out.save("output.jpg")
And the output returned by my code:

My program works fine for black and white images, but I need help changing it to work with several colors (red, orange, yellow, light green, dark green, light blue, dark blue, purple, black and white).
Thanks in advance!
You're doing a few things wrong.
First of all, you should use PNG, not JPG for your output. JPG introduces so many artifacts, that small images like your output get completely degenerated.
Then, you should reduce your palette. It's much easier to work with input containing no noise.
First of all, boring initialization:
from PIL import Image
import operator
from collections import defaultdict
import re

input_path = 'input.jpg'
output_path = 'output.png'
size = (4,4)
Then we declare the palette - this should contain colors of all possible LEGO bricks. I sampled the values below from your image, but you can use black and white like you do in your code, or any colors you want as long as they're similar to colors in the source image:
palette = [
    (45,  50,  50),  #black
    (240, 68,  64),  #red
    (211, 223, 223), #white
    (160, 161, 67),  #green
    (233, 129, 76),  #orange
]
while len(palette) < 256:
    palette.append((0, 0, 0))
The code below will declare palette for PIL, since PIL needs flat array rather than array of tuples:
flat_palette = reduce(lambda a, b: a+b, palette)
assert len(flat_palette) == 768
Now we can declare an image that will hold the palette. We'll use it to reduce the colors from the original image later.
palette_img = Image.new('P', (1, 1), 0)
palette_img.putpalette(flat_palette)
Here we open the image and quantize it. We scale it to size eight times bigger than needed, since we're going to sample the average output later.
multiplier = 8
img = Image.open(input_path)
img = img.resize((size[0] * multiplier, size[1] * multiplier), Image.BICUBIC)
img = img.quantize(palette=palette_img) #reduce the palette
After this, our image looks like this:

We need to convert it back to RGB so that we can sample pixels now:
img = img.convert('RGB')
Now we're going to construct our final image. To do this, we'll sample how many pixels of each palette color each square in the bigger image contains. Then we'll choose the color that occurs most often.
out = Image.new('RGB', size)
for x in range(size[0]):
    for y in range(size[1]):
        #sample at get average color in the corresponding square
        histogram = defaultdict(int)
        for x2 in range(x * multiplier, (x + 1) * multiplier):
            for y2 in range(y * multiplier, (y + 1) * multiplier):
                histogram[img.getpixel((x2,y2))] += 1
        color = max(histogram.iteritems(), key=operator.itemgetter(1))[0]
        out.putpixel((x, y), color)
Finally, we save the output:
out.save(output_path)
The result:

Upscaled by 1600%:

Just for fun, I tackled this with ImageMagick - which is also callable from Python...
First off, I create a little custom palette to match your colours - your white is not very white and your green is different from ImageMagick's idea of green so I used hex for them instead of colour names.
convert xc:black xc:red xc:"rgb(200,200,200)" xc:"rgb(168,228,23)" xc:orange +append palette.png
If I scale that palette up, it looks like this:

Then I resize your image down to 4x4 and map the result to the custom palette and scale it back up so you can see it like this:
convert lego.jpg -resize 4x4! +dither -remap palette.png -scale 1600 result.png
and here is the result

The white is off to match the "white" in your original.
If you love us? You can donate to us via Paypal or buy me a coffee so we can maintain and grow! Thank you!
Donate Us With