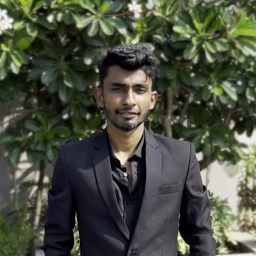
I am new to OpenCV and I have images that need to be cropped to perfect passport size photos. I have thousands of images that need to be cropped and straightened automatically like this. If the image is too blur and not able to crop I need it to be copied to the rejected folder. I tried to do using haar cascade but this approach is giving me only face. But I need a face with a photo-cropped background. Can anyone tell me how I can code this in OpenCV or any?
            gray = cv2.cvtColor(img, cv2.COLOR_BGR2GRAY)
            faceCascade = cv2.CascadeClassifier(
                cv2.data.haarcascades + "haarcascade_frontalface_default.xml")
            faces = faceCascade.detectMultiScale(
                gray,
                scaleFactor=1.3,
                minNeighbors=3,
                minSize=(30, 30)
            )
            if(len(faces) == 1):
                for (x, y, w, h) in faces:
                    if(x-w < 100 and y-h < 100):
                        ystart = int(y-y*int(y1)/100)
                        xstart = int(x-x*int(x1)/100)
                        yend = int(h+h*int(y1)/100)
                        xend = int(w+w*int(y2)/100)
                        roi_color = img[ystart:y + yend, xstart:x + xend]
                        cv2.imwrite(path, roi_color)

                    else:
                        rejectedCount += 1
                        cv2.imwrite(path, img)
Before


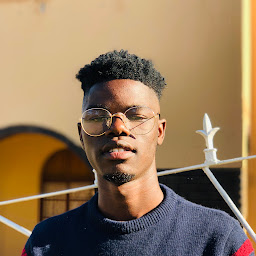
After


Drag the crop box to classic passport photo shape and then click the Crop Selection button. Select Custom Size from the Resize Your Picture menu, and choose a width of 215 pixels and a height of 281 pixels. Save As a JPG image format. Click I'm Done, Resize My Picture.
There is no specific function for cropping using OpenCV, NumPy array slicing is what does the job. Every image that is read in, gets stored in a 2D array (for each color channel). Simply specify the height and width (in pixels) of the area to be cropped. And it's done!
I will handle your problem as follows:
We have more methods:
windows paint applicationcv2. I'm going to show you how to do that using cv2.Also note that this does not yield a high resolution image, you have to play around the code yourself.
# imports
import numpy as np
import cv2

width = height = 600 # normal passport photo size in pixels

# global variable that will update the points when we clicked on the image
pt1 = []
pt2 = np.float32([[0, 0], [height, 0], [0, width], [height, width]])
def mouseEvent(event, x, y, flags, param):
    if event == cv2.EVENT_LBUTTONDOWN:
        global pt1
        if len(pt1) == 4:
            pt1 = []
        else:
            pt1.append([x, y])

while 1:
    image = cv2.imread("img.jpg", cv2.IMREAD_UNCHANGED)
    cv2.imshow("Original Image", image)
    cv2.setMouseCallback("Original Image", mouseEvent)
    if cv2.waitKey(1) & 0xFF == ord('q'):
        break
    if len(pt1) == 4:
        break
Then we use two cv2 functions which are getPerspectiveTransform and warpPerspective. The getPerspectiveTransform() will accept two points which our pt1 and pt2 then we are going to call the warpPerspective() function and pass three positional args, the image, the matrix and the image shape:
image = cv2.imread("img.jpg", 0)
matrix = cv2.getPerspectiveTransform(np.float32(pt1), pt2)
image = cv2.warpPerspective(image, matrix, image.shape)
cv2.imshow("Wrap Perspective", image)
cv2.waitKey(0)
I know this is not a good explanation but you get the idea. The whole code program will look as follows:
import numpy as np
import cv2

width = height = 600 # normal passport photo size in pixels
pt1 = []
pt2 = np.float32([[0, 0], [height, 0], [0, width], [height, width]])
def mouseEvent(event, x, y, flags, param):
    if event == cv2.EVENT_LBUTTONDOWN:
        global pt1
        if len(pt1) == 4:
            pt1 = []
        else:
            pt1.append([x, y])
while 1:
    image = cv2.imread("img.jpg", cv2.IMREAD_UNCHANGED)
    cv2.imshow("Original Image", image)
    cv2.setMouseCallback("Original Image", mouseEvent)
    if cv2.waitKey(1) & 0xFF == ord('q'):
        break
    if len(pt1) == 4:
        break

image = cv2.imread("img.jpg", 0)
matrix = cv2.getPerspectiveTransform(np.float32(pt1), pt2)
image = cv2.warpPerspective(image, matrix, image.shape)
cv2.imshow("Wrap Perspective", image)
cv2.waitKey(0)
A-D. for example if this is your image:------------------
| (a) (b)|
| |
| |
| |
| |
| |
| (c) (d)|
-------------------
Where a, b, c and d are the points you are interested in on your image crop.

Click point 1 then 2 then 3 and lastly 4 to get the results above
Here is one way to extract the photo in Python/OpenCV by keying on the black lines surrounding the image.
Input:

 - Read the input
 - Pad the image with white so that the lines can be extended until intersection
 - Threshold on black to extract the lines
 - Apply morphology close to try to connect the lines somewhat
 - Get the contours and filter on area drawing the contours on a black background
 - Apply morphology close again to fill the line centers
 - Skeletonize to thin the lines
 - Get the Hough lines and draw them as white on a black background
 - Floodfill the center of the rectangle of lines to fill with mid-gray. Then convert that image to binary so that the gray becomes white and all else is black.
 - Get the coordinates of all non-black pixels and then from the coordinates get the rotated rectangle.
 - Use the angle and center of the rotated rectangle to unrotated both the padded image and this mask image via an Affine warp
 - (Alternately, get the four corners of the rotated rectangle from the mask and then project that to the padded input domain using the affine matrix)
- Get the coordinates of all non-black pixels in the unrotated mask and compute its rotated rectangle.
 - Get the bounding box of the (un-)rotated rectangle
 - Use those bounds to crop the padded image
 - Save the results

import cv2
import numpy as np
import math
from skimage.morphology import skeletonize

# read image
img = cv2.imread('passport.jpg')
ht, wd = img.shape[:2]

# pad image with white by 20% on all sides
padpct = 20
xpad = int(wd*padpct/100)
ypad = int(ht*padpct/100)
imgpad = cv2.copyMakeBorder(img, ypad, ypad, xpad, xpad, borderType=cv2.BORDER_CONSTANT, value=(255,255,255))
ht2, wd2 = imgpad.shape[:2]

# threshold on black
low = (0,0,0)
high = (20,20,20)

# threshold
thresh = cv2.inRange(imgpad, low, high)

# apply morphology to connect the white lines
kernel = np.ones((5,5), np.uint8)
morph = cv2.morphologyEx(thresh, cv2.MORPH_CLOSE, kernel)

# get contours
contours = cv2.findContours(thresh, cv2.RETR_EXTERNAL, cv2.CHAIN_APPROX_SIMPLE)
contours = contours[0] if len(contours) == 2 else contours[1]

# filter on area
mask = np.zeros((ht2,wd2), dtype=np.uint8)
for cntr in contours:
    area = cv2.contourArea(cntr)
    if area > 20:
        cv2.drawContours(mask, [cntr], 0, 255, 1)

# apply morphology to connect the white lines and divide by 255 to make image in range 0 to 1
kernel = np.ones((5,5), np.uint8)
bmask = cv2.morphologyEx(mask, cv2.MORPH_CLOSE, kernel)/255

# apply thinning (skeletonizing)
skeleton = skeletonize(bmask)
skeleton = (255*skeleton).clip(0,255).astype(np.uint8)

# get hough lines
line_img = np.zeros_like(imgpad, dtype=np.uint8)
lines= cv2.HoughLines(skeleton, 1, math.pi/180.0, 90, np.array([]), 0, 0)
a,b,c = lines.shape
for i in range(a):
    rho = lines[i][0][0]
    theta = lines[i][0][1]
    a = math.cos(theta)
    b = math.sin(theta)
    x0, y0 = a*rho, b*rho
    pt1 = ( int(x0+1000*(-b)), int(y0+1000*(a)) )
    pt2 = ( int(x0-1000*(-b)), int(y0-1000*(a)) )
    cv2.line(line_img, pt1, pt2, (255, 255, 255), 1)

# floodfill with mid-gray (128)
xcent = int(wd2/2)
ycent = int(ht2/2)
ffmask = np.zeros((ht2+2, wd2+2), np.uint8)
mask2 = line_img.copy()
mask2 = cv2.floodFill(mask2, ffmask, (xcent,ycent), (128,128,128))[1]

# convert mask2 to binary
mask2[mask2 != 128] = 0
mask2[mask2 == 128] = 255
mask2 = mask2[:,:,0]

# get coordinates of all non-zero pixels
# NOTE: must transpose since numpy coords are y,x and opencv uses x,y
coords = np.column_stack(np.where(mask2.transpose() > 0))

# get rotated rectangle from coords
rotrect = cv2.minAreaRect(coords)
(center), (width,height), angle = rotrect
# from https://www.pyimagesearch.com/2017/02/20/text-skew-correction-opencv-python/
# the `cv2.minAreaRect` function returns values in the
# range [-90, 0); as the rectangle rotates clockwise the
# returned angle trends to 0 -- in this special case we
# need to add 90 degrees to the angle
if angle < -45:
    angle = -(90 + angle)

# otherwise, just take the inverse of the angle to make
# it positive
else:
    angle = -angle

# compute correction rotation
rotation = -angle - 90

# compute rotation affine matrix
M = cv2.getRotationMatrix2D(center, rotation, scale=1.0)

# unrotate imgpad and mask2 using affine warp
rot_img = cv2.warpAffine(imgpad, M, (wd2, ht2), flags=cv2.INTER_CUBIC, borderValue=(0,0,0))
rot_mask2= cv2.warpAffine(mask2, M, (wd2, ht2), flags=cv2.INTER_CUBIC, borderValue=(0,0,0))

# get coordinates of all non-zero pixels
# NOTE: must transpose since numpy coords are y,x and opencv uses x,y
coords2 = np.column_stack(np.where(rot_mask2.transpose() > 0))

# get bounding box
x,y,w,h = cv2.boundingRect(coords2)
print(x,y,w,h)

# crop rot_img
result = rot_img[y:y+h, x:x+w]

# save resulting images
cv2.imwrite('passport_pad.jpg',imgpad)
cv2.imwrite('passport_thresh.jpg',thresh)
cv2.imwrite('passport_morph.jpg',morph)
cv2.imwrite('passport_mask.jpg',mask)
cv2.imwrite('passport_skeleton.jpg',skeleton)
cv2.imwrite('passport_line_img.jpg',line_img)
cv2.imwrite('passport_mask2.jpg',mask2)
cv2.imwrite('passport_rot_img.jpg',rot_img)
cv2.imwrite('passport_rot_mask2.jpg',rot_mask2)
cv2.imwrite('passport_result.jpg',result)

# show thresh and result
cv2.imshow("imgpad", imgpad)
cv2.imshow("thresh", thresh)
cv2.imshow("morph", morph)
cv2.imshow("mask", mask)
cv2.imshow("skeleton", skeleton)
cv2.imshow("line_img", line_img)
cv2.imshow("mask2", mask2)
cv2.imshow("rot_img", rot_img)
cv2.imshow("rot_mask2", rot_mask2)
cv2.imshow("result", result)
cv2.waitKey(0)
cv2.destroyAllWindows()
Padded Image:

Threshold Image:

Morphology cleaned Image:

Mask1 Image:

Skeleton Image:

(Hough) Line Image:

Floodfilled Line Image - Mask2:

Unrotated Padded Image:

Unrotated Mask2 Image:

Cropped Image:

If you love us? You can donate to us via Paypal or buy me a coffee so we can maintain and grow! Thank you!
Donate Us With