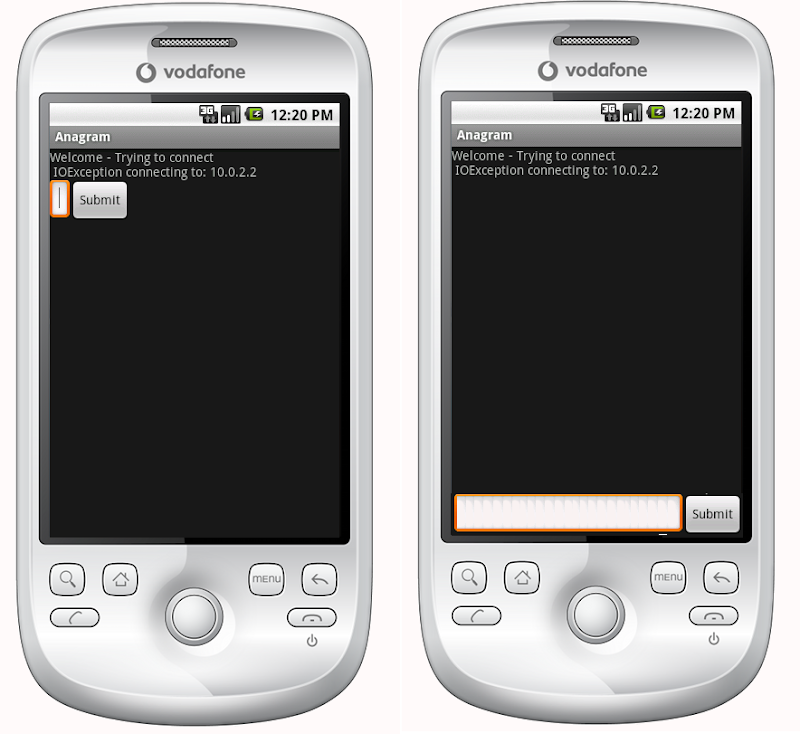
Here's my layout code;
<?xml version="1.0" encoding="utf-8"?> <LinearLayout xmlns:android="http://schemas.android.com/apk/res/android" android:orientation="vertical" android:layout_width="fill_parent" android:layout_height="fill_parent"> <TextView android:text="@string/welcome" android:id="@+id/TextView" android:layout_width="fill_parent" android:layout_height="wrap_content"> </TextView> <LinearLayout android:id="@+id/LinearLayout" android:orientation="horizontal" android:layout_width="wrap_content" android:layout_height="wrap_content" android:gravity="bottom"> <EditText android:id="@+id/EditText" android:layout_width="fill_parent" android:layout_height="wrap_content"> </EditText> <Button android:text="@string/label_submit_button" android:id="@+id/Button" android:layout_width="wrap_content" android:layout_height="wrap_content"> </Button> </LinearLayout> </LinearLayout> What this looks like is on the left and what I want it to look like is on the right.

The obvious answer is to set the TextView to fill_parent on height, but this causes no room to be left for the button or entry field.
Essentially the issue is that I want the submit button and the text entry to be a fixed height at the bottom and the text view to fill the rest of the space. Similarly, in the horizontal linear layout I want the submit button to wrap its content and for the text entry to fill the rest of the space.
If the first item in a linear layout is told to fill_parent it does exactly that, leaving no room for other items. How do I get an item which is first in a linear layout to fill all space apart from the minimum required by the rest of the items in the layout?
Relative layouts were indeed the answer:
<?xml version="1.0" encoding="utf-8"?> <RelativeLayout xmlns:android="http://schemas.android.com/apk/res/android" android:layout_width="fill_parent" android:layout_height="fill_parent"> <TextView android:text="@string/welcome" android:id="@+id/TextView" android:layout_width="fill_parent" android:layout_height="wrap_content" android:layout_alignParentTop="true"> </TextView> <RelativeLayout android:id="@+id/InnerRelativeLayout" android:layout_width="wrap_content" android:layout_height="wrap_content" android:layout_alignParentBottom="true" > <Button android:text="@string/label_submit_button" android:id="@+id/Button" android:layout_alignParentRight="true" android:layout_width="wrap_content" android:layout_height="wrap_content"> </Button> <EditText android:id="@+id/EditText" android:layout_width="fill_parent" android:layout_toLeftOf="@id/Button" android:layout_height="wrap_content"> </EditText> </RelativeLayout> </RelativeLayout> You can set the layout_height="0dp" of your header, footer and ScrollView and define a layout_weight . Just play around with the values until you find out which works best. The resulting heights of header and footer would dynamically change with the screensize.
To center a view, just drag the handles to all four sides of the parent.
RelativeLayout is a view group that displays child views in relative positions. The position of each view can be specified as relative to sibling elements (such as to the left-of or below another view) or in positions relative to the parent RelativeLayout area (such as aligned to the bottom, left or center).
The modern way to do this is to have a ConstraintLayout and constrain the bottom of the view to the bottom of the ConstraintLayout with app:layout_constraintBottom_toBottomOf="parent"
The example below creates a FloatingActionButton that will be aligned to the end and the bottom of the screen.
<android.support.constraint.ConstraintLayout xmlns:android="http://schemas.android.com/apk/res/android" xmlns:app="http://schemas.android.com/apk/res-auto" xmlns:tools="http://schemas.android.com/tools" android:layout_height="match_parent" android:layout_width="match_parent"> <android.support.design.widget.FloatingActionButton android:layout_height="wrap_content" android:layout_width="wrap_content" app:layout_constraintBottom_toBottomOf="parent" app:layout_constraintEnd_toEndOf="parent" /> </android.support.constraint.ConstraintLayout> For reference, I will keep my old answer.
Before the introduction of ConstraintLayout the answer was a relative layout.
If you have a relative layout that fills the whole screen you should be able to use android:layout_alignParentBottom to move the button to the bottom of the screen.
If your views at the bottom are not shown in a relative layout then maybe the layout above it takes all the space. In this case you can put the view, that should be at the bottom, first in your layout file and position the rest of the layout above the views with android:layout_above. This enables the bottom view to take as much space as it needs, and the rest of the layout can fill all the rest of the screen.
If you love us? You can donate to us via Paypal or buy me a coffee so we can maintain and grow! Thank you!
Donate Us With